
A fun project…if you are slightly masochistic, Ha! Pebble mosaics!
Do you love leaning over for great lengths of time, want to firm up your abs, have a good set of knee pads already, and don’t mind playing with cement and grout? Maybe pebble mosaics making is for you! 😉


I was younger then…hahahaha! 2014 and my knees were younger as well! There was well over 160′ of paths, it took me a while and the rocks were so easy to source. A drive down to the coast netted me various colours and presorted sizes of these lovely beach pebbles to work with! They came in feed sacks, weighed, way more than feed, but the guys would load them up down at the beach and I’d drive them back to the ranch.
I had great ambitions this Spring as we were leaving Baja and convinced Mike a few sacks of the pebbles in the back of the truck would be out of the way and hey, it’s a big truck, it wouldn’t notice a few more hundred pounds of rocks would it? They were already bagged up so I didn’t get a chance to see them super well, they were blue, 1″ I thought, but turns out most were quite a bit smaller, sigh, that just means they take WAY more time to place but it also lets you add better detail. Still interested? Go buy this book!


Maggie Howarth’s book is the bible for pebble moaiscs! https://www.maggyhowarth.co.uk/ A big thank you to Stefan and Stephanie who gifted me a new and expanded version of the book!
She goes through all the steps you need to do these, but you do need to practice with stone flow, filling, and of course designs. I sketched out most of what I wanted to do, then added the pebble shapes in pencil to see what direction they needed to go. In Baja it was easy, we were all sand, everywhere, just playing with pebbles beside the path, laying them out, then moving them over when I was ready…not here in Canada. Did I mention our house actually sits on one huge rock?! That was then…this is now:


First, acquire pebbles! I had the four large bags I brought back from Baja, plus two I bought in San Diego of the maroon colour, then I knew it wasn’t going to be enough so I dragged Mike all over Ottawa looking for pebbles until I came upon Cohen and Cohen Natural Stone. All in search of those beach pebbles from Baja. Careful here, this store could be addictive! I wandered around glassy-eyed staring at rocks, big as VW’s to tiny wee bits of stone…heaven! Apparently, most people start these projects in Spring the lovely lady explained as I fondled their large box of sample stones up front. No, I didn’t steal any! They didn’t have many left, but she’d take me back and show me. They had GREEN ones! I was very very happy, and some beautiful semi-polished beige ones as well. I took their last 5 bags, sorry folks, you’ll have to wait for Spring now! I felt like Gollum clutching at the one ring with my rocks!
I went home and started sorting. Buckets are great for this, separate by colour, and size. Also, have someone strong go with you to get the sand and cement;) ha! I Baja, I would go into the arroyo with the tractor bucket, scoop up some sand, then sift it through various mesh sizes to get my mix, not here! OMG, you can just buy sand! Clean, perfect sand! I was cheating I felt…and a bag of Portland cement. I asked about premixed bags of cement but they all were with gravel, no good at all! Now, back home to plan!
You need some stonework to contain your pebble mosaics. I walked around our large rock here, and found dozens of small rocks that fit the bill to make a framework to work within. I then built a 32″ x 32″ frame of wood, put it on the ground, and filled it with the wonderful sand, this was the starting point of the designs. Caution, if you have cats, such a frame was approached with great glee the first day, dug in, half the sand flung out as happy cats spun around in it, and pooped in…sigh…note to self, cover frame with white tarp, especially if there is a partial design on the go!
The actual first preparation was getting a small load of crushed rock/gravel dumped in front of the alcove. I needed to level the area off I was working in so water would run off. I wetted it down and tamped it with a piece of wood…Baja style, a 2″x 6″X 12″ long with a handle screwed on, for several days until I was satisfied it was really well packed down. I’m a bit worried about the freeze and thaw but we’ll see! Life is an adventure right?!
I’d seen some pebble mosaics surrounded by white rocks so I thought I might give it a try. The first bag I bought was marble, too soft and falling apart, perhaps suited to potted plants but not mosaics. I also went looking for glass pebbles to do the wings of the dragonfly and bumblebee I’d planned. See, still sourcing rocks! Walmart had glass pebbles for vases so I bought two bags of those and found some 1″ ones online, and ordered them, Amazon can be handy! I did read to keep the glass pebbles out of high-traffic areas so decided they would be on my right, where we don’t walk in as much. Then to the planning!


Decided on a bumblebee to fill the first small corner, the dragonfly was getting too big! Those wings! Finally found some smaller white stones that were not too soft. Added some stones around the white that I brought back from Baja. After the design is set into the dry cement and sand mix I tamp it down with a 2″ x 6″ X 1″ board and hammer very gently to try to get it as level as possible. I angled this one down for drainage. Then it gets sprayed with a hand sprayer until thoroughly soaked, repeat every four hours then tomorrow again until it is set. I use the board to stop the work, seams are always tough! This is where the practice comes in! I found a small sprayer for insecticides/fertilizer at Home Hardware for under $30. Not too heavy, easy to fill, and pump up as well. I was happy for some extra cushions below my knees on top of the tiling pads I have! My knees appear to be saying I am not immortal…Ha!
The next day I retrieved my shade umbrella from the front, if I am going to abuse my knees, at least it will be shady abuse!


Dragonfly was moved from the frame full of sand to the cement and sand mix beside the bumblebee. I mix small batches in the wheelbarrow, one cement, and three sand, mix and mix and mix until it is absolutely all the same colour! I fill the area I’m working in about 2-2.5″ deep, giving me room to tamp down the bigger pebbles. After I place the main design I think: try to keep following the flow, like water, rivers, eddies forming circles. Creating a bit of movement. In Mexico initially, I did a lot of straight lines but this needed something different, you learn to look at the pebbles and sizes and create other small designs in those spaces you are filling. I’d forgotten the leaning over the entire design for hours feeling…That’s what those stomach muscles are for!


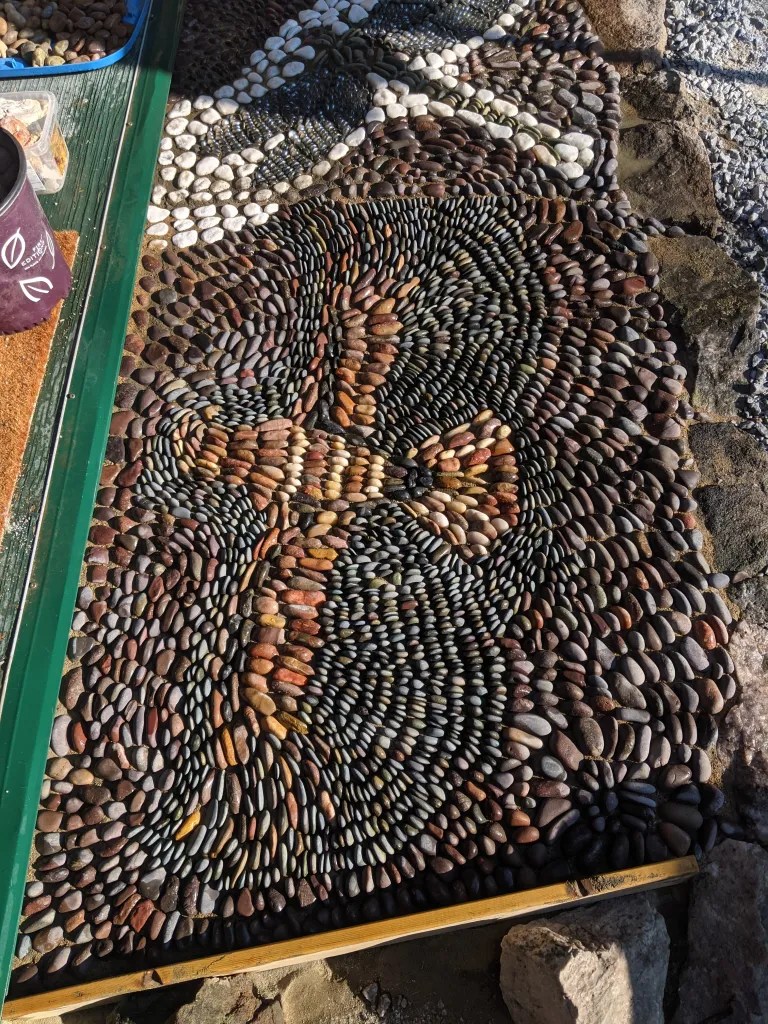
I struggled with a few different bird of prey designs but this one fit the space. I got it a bit close to the edge of the alcove but was happy I found a perfect stone for the beak! One of the several hundred rocks I picked up in Baja, Arizona, and New Mexico walking on trails and around the campgrounds! This was a bit larger, longer, all those small rocks, yikes, that took a few hours of sitting, placing, sorting, getting up and moving around, then going back to placing! I was running out of the burgundy rocks I brought back from Baja, I was even using the ugly ones, not symmetrical, placing them along the edge of the house where they were less noticeable! I did have @4 80lb bags of the smaller-than-I-anticipated rocks! Ha!
For the last design I struggled making mushrooms, they just didn’t look right, I still had a bunch of the beautiful green and beige semi-polished pebbles so decided a turtle it was going to be!


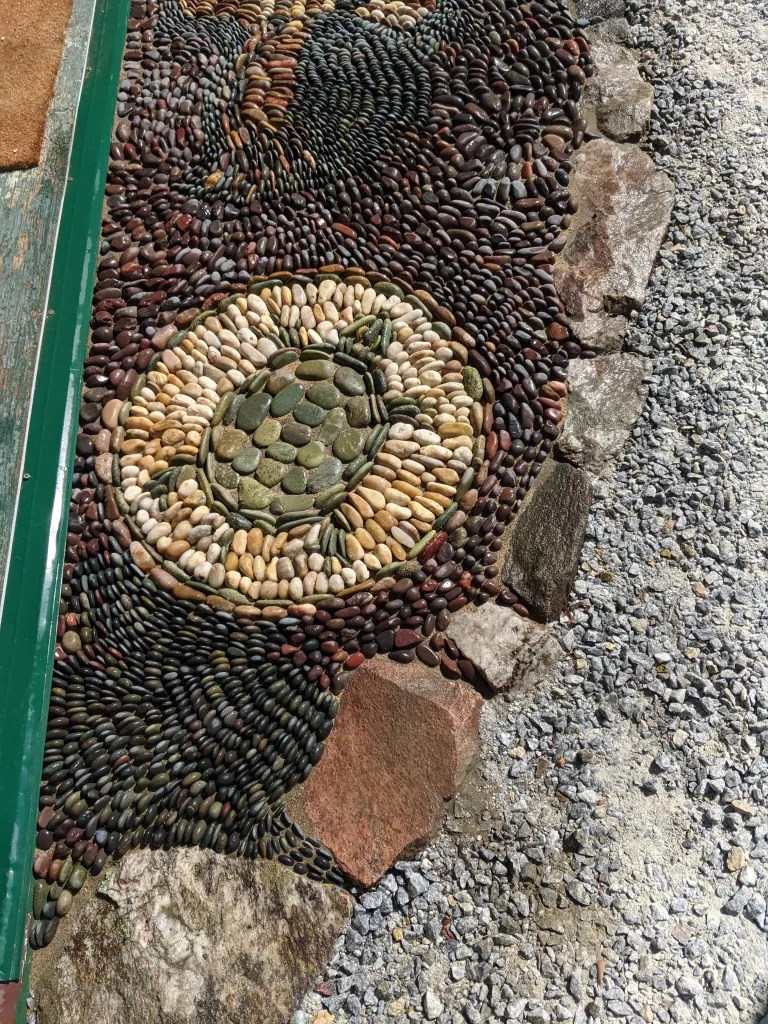
I used all the remaining burgundy stones and had to switch over to the small blue ones to finish the project. I’d get up every 20 minutes and sort through another giant pail of tiny blue rocks, picking out the biggest ones to use! Then it was done! The base design! It now needed to be cured for a week or so. I wanted to see how the smaller pebbles held up as well. It was watered twice a day, this time with just the hose for the entire week, or more, while I went in search of a sanded grout colour I liked. Yes, it still needed to be grouted! ha!
I apply approximately a 1/2″ layer, sometimes more, of dry sanded coloured grout and use a soft paintbrush to ensure it gets into every small crevice and crack then it is misted with a sprayer just until water pools. Then you have to go over it a few times to ensure the bubbles and small holes are filled. Occasionally you have to go back after it is dry to fill small missed spots or where it is too thin. I missed a few bits that were too high with cement that I had to chip out with a chisel and apply more grout to several small spots. Once it’s cured for a few days, it gets sprayed for the next week, I can use grout remover/muriatic acid on the white and light-colored rocks to remove any grout haze, then seal it! I did finally find some “earth” coloured grout at Home Depot, bonus was it was on sale for $11 a 25lb bag…woohoo! I bought the last three they had, wasn’t sure how much I would need. I have leftovers for the next project…mwhahahahahaha!
A video of the design after grouting!:
https://www.facebook.com/100000224080592/videos/a.991827177501409/1294243954534169
I left it for a few weeks after grouting, took my time, cleaned the grout haze off the white rocks, filled a few more holes, and looked around for sealer. Our friends Pam and Graham mentioned they had used a concrete sealer around their stamped pool edge and asked if I wanted to come look. I wanted a bit of a sheen, and hopefully, something to protect from the freeze and thaw cycle. I liked the way the sealer looked, they told me to take the 5-gallon can and use what I needed, which turned out to be only about 5 cups worth, and then to bring it back! Thanks you two! So ta-dah, the finished project! I waited until the leaves were not blowing about too much and got out the knee pads and cushions for one more spell! I applied the sealer with a brush, the small foam roller wasn’t working getting into the smaller crevices and it looks beautiful!

I will let you know in the Spring how the freeze-thaw worked out and snow removal as well;) Excuse my shadow here!

Anyone want to borrow the book, let me know;)
OMG Pam, what a labour of love!! It looks fabulous!! After installing a floor recently I can only begin to imagine what your hamstrings, lower back and butt felt like!! 🙂